LST4WBK2-3

Features
Optical Power Handling: 50 W
Aperture: 4 mm
Switching Speed: 10 ms
Logic Position Sensors
Wavelength: 355 nm
$795.00
Submit RFQ

LST4WBK2

Applications
OEM Safety
High Rep Rate DPSS
Thin Working Zones
Small Package
Consult With Us

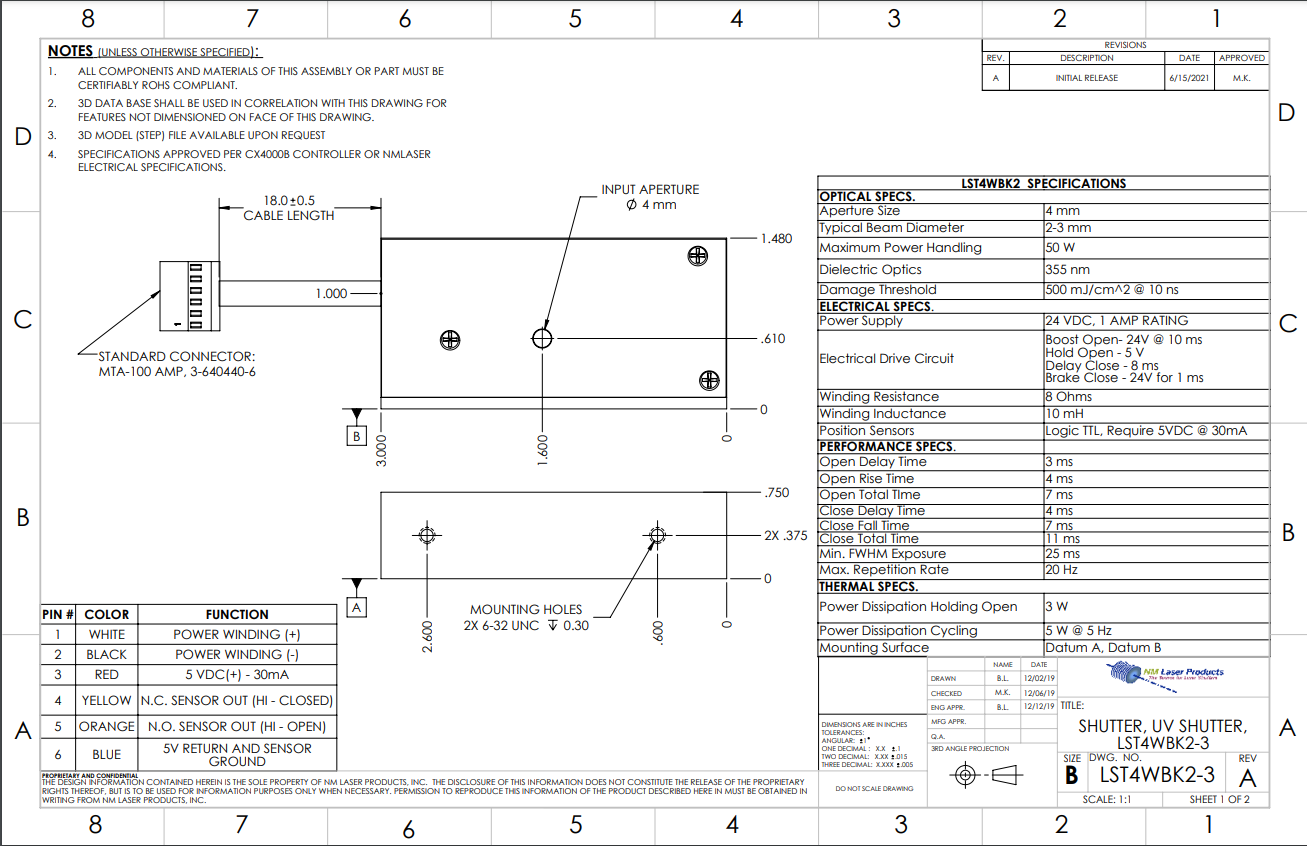
Optical Specifications


Aperture Diameter 4 mm
Typical Beam Diameter 2 – 3 mm
Max. Optical Power Handling 50 W
Optics Dielectric
Wavelength 355 nm
Laser Induced Damage Threshold 500 mJ/cm2 @ 10 ns

Performance Specifications


Open Delay Time 3 ms
Open Rise Time 4 ms
Open Total Time 7 ms
Close Delay Time 4 ms
Close Fall Time 7 ms
Close Total Time 11 ms
Min. FWHM Exposure 25 ms
Max. Shutter Repetition Rate 20 Hz
Lifetime Available

Thermal Specifications


Thermal Power Dissipation Holding Open 3 W
Thermal Power Dissipation, Cycling 5 W @ 5 Hz
Mounting Surface for Thermal Sinking Datum A, Datum B

Custom Options


Wire Length Any length
Wire/Cable Type, Wire Gauge Teflon, Vinyl
Connector Any 6-pin connector
Identification Engraving, Labels

Electrical Drive Data


Power Supply 24 VDC, +1.5 Amp Rating
Electrical Drive Circuit Boost Open = 24 V @ 15 ms
Hold Open = 5 V
Delay Close = 8 ms
Brake Close = 24 V for 1 ms
Recommended Controller
(and Voltage Present)
CX4000B
(or Capacitor Discharge 24 V, 24 V PWM)
Winding Resistance 8 ohms Nominal
Winding Inductance 10 mH
Position Sensors Logic TTL, Require 5 VDC @ 30 mA
Cable/Wire Type, No., Length
Termination
22 g, six wires, 18 in.,
MTA-100, AMP, P/N 643813-60
User Drive Circuit/Cap Discharge 24 V, C = 2200 uF, R = 30 ohm, Flyback diode 1N4001 BUILT-IN STD
User Drive Circuit/PWM Type 24 V for 15 ms, then drop to 5 V hold, use Flyback BUILT-IN
User Power Supply Notes 24 VDC, 1 A Rating,
Surge Capacitor on output, 3 A Rating
Read sensor outputs with reference to the blue ground wire. These outputs are totem-pole buffered TTL, seeking a load of ~10 K ohms. Typical output is 4.5 V. Do not try to draw more than about 5 mA from the Yellow or Orange outputs, or the voltage will load down.

Wire Pin # - Color


1 – White Power Winding (+)
2 – Black Power Winding (-)
3 – Red 5 VDC (+) – 30 mA
4 – Yellow Normally Closed Sensor Output (HI – Closed)
5 – Orange Normally Open Sensor Output (HI – Open)
6 – Blue 5 V Return and Sensor Ground

Attributes


Dimensions 3.0 in. x 0.75 in. x 1.48 in.
Weight ~5 oz.
Classification Safety/Process
Specifications Date June 15, 2021

Description


NM Laser Products LST4WBK2 safety shutter

Beam Properties, Alignment, and Polarization

Each shutter has an optical rating that must be observed to avoid optical and mechanical damage. Carefully consider rated wavelength (for dielectric mirrors) or range of wavelengths (for metal mirrors), CW maximum power, peak energy density (fluence), recommended beam diameter, polarization vector if applicable, and beam alignment. Shutters are designed for typical beams that use 50-80% of the aperture diameter. If a small beam is to be used in a larger aperture, and/or the fluence or CW power is high, our sales/engineering team can recommend safe thresholds to prevent optical damage from operation outside the recommended ranges. Use suffix –1 for 1064 nm, -2 for 532 nm, -3 for 355 nm, -4 for 266 nm, and –12 for 532 + 1064 nm harmonic mirror (lower damage threshold). Use the –C2 suffix for CO2 lasers. Choose the –IR suffix for CO2 and IR use, starting at about 700 nm. Beams need to be aligned and entering the “input aperture” to ensure the dumped energy is reflected to the proper location. Dielectric optics require good alignment practices to provide the highest reflectivity and damage thresholds. The entering beam should be orthogonal to the input face within about 3 degrees. The laser beam should NEVER be directed into the output aperture! If the optics in your shutter are polarized, please ensure that the laser beam polarization is properly aligned with the polarization vector label on input aperture side.

Safe Mounting and Thermal Management

Shutters must be rigidly mounted to keep the beam aligned inside the aperture. The heat generated inside the shutter during normal operation must be handled through proper heatsink mounting. In general, the shutter mount must be made of high thermal conductivity material, there must be a large cross section of material from the shutter base (or body for body mounted models) all the way to the “infinitely” large heatsink, and the mount or hardware in proximity must not be ferromagnetic. This usually leads to using aluminum for the heatsink/mount. Shutter performance will be degraded if temperatures exceed 50 °C, and most shutters will fail to open at temperatures above 80 °C, signaling a thermal overload. Exceeding 110 °C for any amount of time will cause irreversible damage. In situations where you want to isolate the system from shock and vibrations, consider a water chiller plate, or in special cases, air cooling. This allows the shutter to be mechanically “suspended” while still receiving necessary cooling. Air cooling is usually not recommended as this requires careful design considerations.

Electrical Design and Considerations

The power circuit must be properly calibrated to ensure the shutter will perform as intended by the manufacturer. If the boost signal is too short the shutter will not fully open. If the boost is too long, the fast acceleration of the flexure and resulting velocity may cause a recoil instead of a latch to the open state. Of course, a very long boost period will eventually settle, regardless of recoil, but the recoil may be enough to allow light leakage through the aperture. The ideal circuit switches from boost level (typically 24V) to hold level (typically around 6 V) when the flexure arm is about 75% through its travel distance. There should be no significant dropout in voltage between boost and hold, unless properly accounted for. Our controllers are precisely calibrated for each shutter model to ensure optimum performance, peak efficiency, and to maximize lifetime.